Tuesday, March 3, 2015

The Incredible Edible Cure for Burns!

I love to cook, but hate the inevitable burns I receive on a regular basis. Not only does it leave me whimpering at the dinner table, it takes at least a week for the resulting blister to heal, and even longer for the discoloration to fade. That is until...I put a potato on it!


About a week ago, I was frying up a delicioso batch of chiles rellenos and somehow the tip of one of my fingers dipped into the incredibly hot oil! Ouch! (Actually, that's not what I said exactly, but you get the picture!) I immediately ran the finger until cold water to remove the hot oil and help reduce the temperature of the burn. I then took a peek to inspect the damage. It already looked white, like an under-cooked french fry, and it hurt like hell. My sweet kids did what all kids would do in this situation, looked it up on the internet. Their unanimous response was to place a potato on it. They said it might help prevent a blister. Honestly, I was desperate for relief, but really doubted a potato could prevent a 375 degree oil blister from forming...or could it?

I cut a small potato in half, scooped out a small indention with a melon baller, and stuck the tip of my finger in it. I felt immediate relief from the pain! Weird! I kept the potato on my finger until it started to hurt again, in which I melon balled another fresh divot for continuous relief. I did this all evening until the pain was completely eliminated, about 2-3 hours. The next morning I was shocked! Not only was the burn from hell not blistered, it wasn't even red, and it didn't hurt at all! Amazing! So, the next time you get burned, you know what to do, put a potato on it!

Special thanks to the Chinese, who appear to be the ones to discover this excellent remedy!

*Tips: Apparently it is the juice from the potato that brings relief. In addition, you can grate a potato and apply to larger areas, if needed. According to WebMD, it is also supposed to be great for sunburns, infections, boils, arthritis, and sore eyes. Who knew?

Monday, December 8, 2014

Glamorous Gougeres

Gougeres (goo-zhairs) are a classic French appetizer made with "pate a choux" dough (see Mon Petit Chou) and flavored with cheese, traditionally Gruyere, Comte, or Parmesan. Gougeres originated from the Burgundy region in France where they are frequently served at wine tastings. How posh! Although they may appear to be some feat of magic, they are quite simple to make. In addition, they can even be made ahead, refrigerated or frozen to be reheated just before serving. Perfect for the holidays! 

Feel free to play with the seasonings, e.g., Gruyere and a pinch of cayenne or finely chopped thyme, Roquefort and finely chopped toasted walnuts, Manchego and freshly ground black pepper, and following my Texan sensibilities, sharp cheddar and finely chopped green chiles! (I hear French people crying, "Oh la vache!") If you choose the traditional version, you can serve them alongside soup for an elegant accompaniment, cut them in half and fill them with salmon or foie gras mousse, or even make them larger and fill them with Waldorf salad, or serve them with steak as a holder for your steak sauce like bordelaise, hollandaise, or bernaise. The possibilities are truly endless! You must add these babies to your culinary repertoire! You can thank me later!


Gougeres

Makes approximately 50 bite-size gougeres or 8 large ones.

Ingredients:
1 cup milk
1/2 cup (1 stick) butter
1/2 teaspoon salt
1/2 teaspoon sugar
1 cup flour
4 large eggs
pinch of cayenne
1/2 cup (4 ounces) grated Gruyere cheese

Directions:

In a medium saucepan, bring the milk, butter, sugar, cayenne, and salt to a boil over medium heat. Bring to a simmer and stir in the flour, about 1/4 cup at a time, stirring vigorously with a wooden spoon.


The mixture will become a big ball. Remove from the heat and allow to cool to room temperature.


Preheat your oven to 375 degrees.

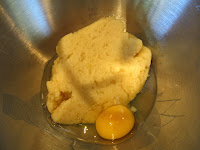
Transfer the blob to the bowl of a stand mixer, or large mixing bowl. Starting with the lowest setting, beat in the eggs, one at a time.


Don't add the next egg until the previous one has been incorporated. Beat until smooth and velvety. Stir in the Gruyere.

Line a cookie sheet with parchment paper or a Silpat mat.

Using a pastry bag or two spoons, pipe or drop approximately 1" balls onto the sheet.


Using your finger dipped into a little milk, pat down the tips from piping, if necessary.


Bake for 25-30 minutes (or approximately 45 minutes for 8 large ones), or until puffed, medium-golden brown, and dry on the outside. (You need to keep and eye on them, and can check to make sure they are fully cooked by cutting one open.) When done, remove to a cooling rack and serve warm. (Some people recommend piercing each one with a skewer or toothpick to allow steam to escape.) 


*If making ahead, allow them to cool completely. Once cooled, they can be stored in an airtight container, refrigerated, or even frozen. To reheat gougeres, bake them in a preheated 350 degree oven for 10 minutes or 15 minutes if unthawed frozen.

Friday, November 7, 2014

EAT MOR CHIKIN!

The Chick-fil-A Chicken Sandwich was invented by S. Truett Cathy at his first restaurant in Atlanta called The Dwarf Grill in 1946. The chicken sandwich, which was based on his mother's recipe, became so popular that in 1967 Cathy opened the first Chick-fil-A restaurant in Atlanta. The company now operates thousands of restaurants in 41 states, raking in more than $5 billion in annual sales. Chick-fil-A is known for their strong Christian values, remaining closed on Sundays as well as controversial views on gay marriage, which sparked protests across the country. S. Truett Cathy passed away in September, but rest assured his son, Dan Cathy, has the chicken empire well under control. 

Whether you love Chick-fil-A or hate them, they do know how to make a damn good chicken sandwich! The not-so-secret secret to Chick-fil-A's success is pickle juice! Yes, that's right, pickle juice. Besides making a terrific marinade to ensure tender, juicy chicken, pickle juice has many uses you may not know. Pickle juice is used by many athletes to relieve muscle cramps and restore electrolytes. There is even a sports drink called Pickle Juice Sport. In addition, pickle juice is touted as a hangover cure, a cure for menstrual cramps and heartburn, and may even stop hiccups! So stop throwing out your pickle juice and start adding it to your dressings, BBQ sauce, or anywhere you would add vinegar. Don't believe me? Why not try this fantastic copycat recipe that's floating around all over the internet for the Chick-fil-A Chicken Sandwich! Cows everywhere will thank you!


Chick-fil-A Chicken Sandwich

Serves 2-4 (The coating is ample for 2 and just enough for 4 chicken cutlets.)

*Waffle fries make the perfect accompaniment!

Ingredients:
1-2 chicken breasts, pounded to 1/2-inch thickness and then cut in half, or 2-4 chicken cutlets (Chicken cutlets are sold at most grocers.)
1/4 cup dill pickle juice
1 egg
1/4 cup milk
1/2 cup flour
1 tablespoon powdered sugar
1/2 teaspoon paprika
1/2 teaspoon salt
1/4 teaspoon black pepper
1/4 teaspoon garlic powder
1/4 teaspoon celery salt
1/4 teaspoon dried basil
1/2 teaspoon cayenne
Oil for frying
2-4 buns, buttered and toasted
Pickle slices (2 per sandwich)
Optional: Mayonnaise, cheese slices, lettuce, and tomato

Directions:
Marinate the chicken in the pickle juice in a quart-size freezer bag for 30 minutes to 1 hour.


Beat the egg with the milk in a bowl. Combine the flour, sugar, paprika, salt, black pepper, garlic powder, celery salt, dried basil, and cayenne in another bowl.


Dip the chicken cutlets in the egg mixture and then coat in the flour on both sides.


Heat the oil in a skillet (1/2-inch deep) to about 345-350. (I don't bother with a thermometer, instead if you drop a small piece of bread in the oil and it immediately starts to bubble, it's ready.) Fry each cutlet for 2 minutes on each side, or until golden and cooked through.


Drain the chicken on a rack over paper towels.


To serve authentically, place 2 pickle slices on the bottom bun, top with the chicken, and then the top bun. Enjoy!